How to Check Your Vehicle’s Sensor System

Contents
- 1 Understanding the Importance of Vehicle Sensors
- 2 Identifying Common Vehicle Sensor Problems
- 3 Preparing for Sensor System Inspection
- 4 Checking OBD-II Trouble Codes
- 5 Inspecting Individual Sensors
- 6 Testing Sensor Outputs
- 7 Replacing Faulty Sensors
- 8 Clearing Diagnostic Trouble Codes
- 9 Regular Maintenance and Periodic Inspections
- 10 Sensible Steps for Ensuring Your Vehicle’s Sensor System Integrity
Understanding the Importance of Vehicle Sensors
Before we delve into the process of checking your vehicle’s sensor system, it’s crucial to understand why sensors are vital for your vehicle’s overall functionality. Vehicle sensors serve various purposes, including:
- Monitoring engine parameters: Sensors such as the oxygen sensor, coolant temperature sensor, and mass airflow sensor help monitor vital engine parameters and ensure optimal fuel-air mixture ratios for efficient combustion.
- Ensuring safety: Sensors like the ABS (Anti-lock Braking System) sensors and traction control sensors help prevent accidents by detecting wheel slippage and modulating brake pressure.
- Enhancing performance: Sensors like the throttle position sensor and MAP (Manifold Absolute Pressure) sensor assist in optimizing engine performance by providing data for fuel injection and ignition timing.
Identifying Common Vehicle Sensor Problems
Before proceeding with checking your vehicle’s sensor system, it’s essential to familiarize yourself with common sensor problems. Identifying these issues can help you narrow down the cause of any potential malfunctions. Here are some common symptoms of faulty sensors:
- Check Engine Light (CEL) illuminates: The CEL indicates a problem detected by the vehicle’s onboard diagnostics system. It can be triggered by various sensor-related issues.
- Engine misfires or poor performance: Faulty sensors may disrupt the engine’s combustion process, leading to misfires, reduced power, or rough idling.
- Decreased fuel efficiency: Malfunctioning sensors can affect the fuel-air mixture ratio, leading to decreased fuel efficiency and increased emissions.
- Unusual exhaust emissions: Faulty oxygen sensors can cause abnormal exhaust emissions, including excessive smoke or unusual smells.
- ABS or traction control warning lights activate: If the ABS or traction control sensors are malfunctioning, you may notice warning lights on your dashboard.
Preparing for Sensor System Inspection
Before starting the inspection process, it’s important to gather the necessary tools and take some precautions. Here’s what you’ll need:
- OBD-II scanner: An OBD-II scanner is essential for reading diagnostic trouble codes (DTCs) stored in your vehicle’s onboard computer system.
- Safety precautions: Ensure that your vehicle is parked on a flat surface, the engine is turned off, and the parking brake is engaged before beginning any inspection.
See more: How to identify errors in vehicle safety systems
Checking OBD-II Trouble Codes
The first step in inspecting your vehicle’s sensor system is checking for any OBD-II trouble codes using an OBD-II scanner. Follow these steps:
- Locate the OBD-II port: The OBD-II port is usually located under the dashboard on the driver’s side. Consult your vehicle’s manual if you’re having trouble finding it.
- Connect the OBD-II scanner: Plug the OBD-II scanner into the port until it clicks into place.
- Turn on the ignition: Turn the ignition key to the “on” position without starting the engine.
- Read and record the trouble codes: Use the scanner to read the trouble codes stored in your vehicle’s computer system. Write down the codes for future reference.
Inspecting Individual Sensors
Once you have obtained the trouble codes, it’s time to inspect individual sensors related to those codes. Here are some common sensors and how to inspect them:
Oxygen Sensor
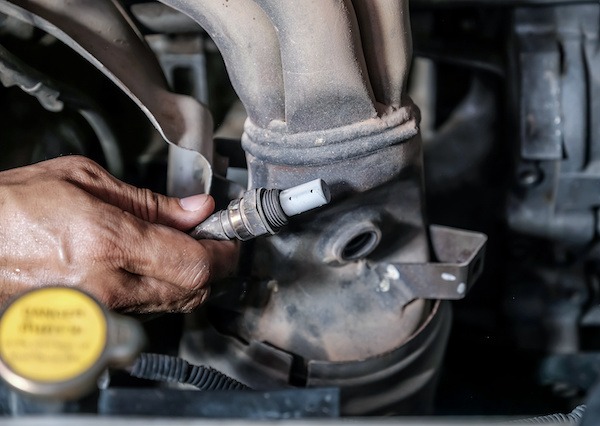
The oxygen sensor measures the oxygen content in the exhaust gases, helping regulate the air-fuel mixture. To inspect the oxygen sensor:
- Locate the oxygen sensor(s): Depending on your vehicle, there can be multiple oxygen sensors located in the exhaust system.
- Disconnect the electrical connector: Carefully disconnect the electrical connector from the oxygen sensor(s).
- Inspect for damage or contamination: Check for any physical damage or contamination on the oxygen sensor(s). Replace if necessary.
- Test with a multimeter (if applicable): If you suspect a faulty oxygen sensor, you can use a multimeter to test its resistance or voltage output.
Mass Airflow Sensor (MAF)
The mass airflow sensor measures the amount of air entering the engine, enabling accurate fuel injection calculations. To inspect the MAF sensor:
- Locate the MAF sensor: The MAF sensor is usually located between the air filter box and the throttle body.
- Disconnect the electrical connector: Gently disconnect the electrical connector from the MAF sensor.
- Inspect for contamination: Check for any debris or oil residue on the MAF sensor’s sensing element. Clean it using MAF sensor cleaner if necessary.
- Test with a multimeter (if applicable): If you suspect a faulty MAF sensor, refer to your vehicle’s service manual for specific testing procedures using a multimeter.
Testing Sensor Outputs
In addition to visual inspections, testing sensor outputs can provide further insights into their functionality. While specific testing methods vary depending on the sensor type, here’s a general approach:
- Throttle Position Sensor (TPS): Use a multimeter to measure voltage changes as you manually move the throttle plate.
- Coolant Temperature Sensor (CTS): Measure resistance across the CTS terminals using a multimeter while comparing readings with temperature charts provided in service manuals.
- Manifold Absolute Pressure (MAP) Sensor: Measure voltage output at different engine load conditions using a multimeter while referring to manufacturer specifications.
A Comprehensive Guide on How to Check and Change Distilled Water in Your Car
Replacing Faulty Sensors
If you have identified a faulty sensor during your inspection, it’s crucial to replace it promptly to restore proper functionality. Here are some general steps for replacing sensors:
- Obtain a replacement sensor: Purchase a compatible replacement sensor from a trusted automotive parts store or dealership.
- Disconnect battery terminals: Disconnect both battery terminals to prevent any electrical mishaps during replacement.
- Remove the old sensor: Depending on its location, use appropriate tools to remove the faulty sensor carefully.
- Install the new sensor: Install the new sensor using proper torque specifications and reconnect any electrical connectors.
- Reconnect battery terminals: Reconnect both battery terminals and ensure they are securely tightened.
Clearing Diagnostic Trouble Codes
After replacing any faulty sensors, it’s essential to clear any diagnostic trouble codes from your vehicle’s computer system. Follow these steps:
- Reconnect OBD-II scanner: Reconnect your OBD-II scanner to the vehicle’s OBD-II port.
- Clear trouble codes: Use the scanner’s menu options to clear any trouble codes stored in your vehicle’s computer system.
- Verify code clearing: Restart your vehicle and re-scan for trouble codes to ensure they have been successfully cleared.
Regular Maintenance and Periodic Inspections
To ensure your vehicle’s sensor system continues to function optimally, it’s crucial to perform regular maintenance and periodic inspections. Here are some tips to keep in mind:
- Follow manufacturer-recommended service intervals for replacing sensors or performing maintenance tasks.
- Keep an eye on warning lights or unusual symptoms that may indicate potential sensor problems.
- Regularly clean intake components like air filters and throttle bodies to prevent contamination-related issues with sensors.
Sensible Steps for Ensuring Your Vehicle’s Sensor System Integrity
Checking your vehicle’s sensor system is an integral part of ensuring its optimal performance and safety. By following this comprehensive guide, you can identify common sensor problems, inspect individual sensors, test their outputs, and replace faulty sensors if necessary. Remember to exercise caution, refer to your vehicle’s service manual when needed, and perform regular maintenance to keep your vehicle running smoothly. Happy motoring!
See more news at: car care vip


